2m/70-cm Dual Band Threaded Rod J-Pole Antenna

This build was inspired by NT1K's dual bander. All the heavy lifting was done by him. I adapted the design to use threaded rod instead of aluminum. This was 1) due to cost savings and 2) availability. I was able to source all the components locally for the threaded rod build.


There were some trade offs. You do lose a bit of conductivity by using galvinized (zinc coated) threaded rod instead of aluminum. Also, if you plan on using this outside permanetly, make extra effort to seal up where the hex nut marries the threaded rod sections. If water gets in there and freezes it won't be fun. In my use case, I set it up permanently in my attic - you'll notice it isn't completely vertical. It was too tall to fit that way! So I installed it at a slight angle.
I scrounged the aluminum mounting bracket from scrap and drilled it to NT1K's specifications in the drawings above. For the feed point, I was able to source it locally from Flying J on the North Service Road in Moose Jaw. It's a simple CB Mounting Stud, complete with plastic separator washer.


The other thing I used not in the drawings was a 3/8 hex nut. This was used to join the 2 pieces of the threaded rod as the longest section I could buy in town at Rona was only 3 feet long. The hex nut works slick to join the rod sections together. I put a nylon lock nut on top and bottom of the hex nut to further make sure it stayed put.


The other consideration when using threaded rod is that the threads for the CB Stud mount are different. I had to re-thread the end of the driven element to make it fit the mount. The threaded rod is 3/8 by 16 threads while the mount is 3/8 by 24. This wasn't a big deal, I just used a tap and die set to thread right over top.

The real magic of this build is that it is totally tunable! You can adjust the reflector and 70cm stub very easily just by screwing the elements higher or lower in the mounting bracket. You could disassemble the whole thing relatively easily for portable use as well.
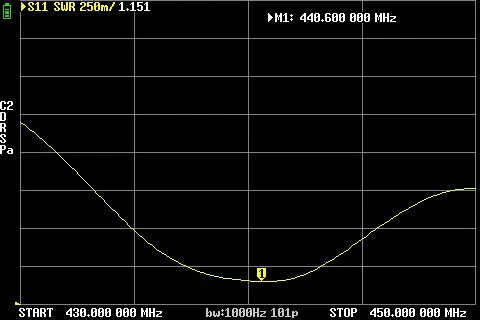
As you can see from the SWR screenshots from the Nano VNA, it turned out pretty darn good installed in the attic. It's really good on 440. I can hit the VE5CI repeater on .5 Watts easily and even the VE5ARG repeater in Avonlea.

Thanks for checking out this build!
VE5REV 73!